Friday, December 30, 2022

Create a Custom API in PowerApps and Use it

 Step-by-step process to create a custom API 

- Use Custom APIs to create our own APIs in Dataverse. We can consolidate one or more operations into a Custom API that developers can call in their code or from Power Automate.

- We can use Custom API as business events to enable creating new integration capabilities such as exposing a new type of trigger event in the Microsoft Dataverse connector.

Custom APIs are an alternative to Custom process actions. Custom process actions provide a no-code way to include custom messages but have some limitations for developers. Custom APIs provide capabilities specifically for developers to define their logic in code with more options.

Let's begin:

Note: 

1. When creating a Custom API, we must use a solution.
2. 
Many fields related to creating Custom API cannot be changed once created. We should carefully plan the design of the Custom API before we start. If later decide that we need to change things once created the Custom API, we may need to delete the existing record and re-create the Custom API. Refer to Custom API Tables to review the column which can not be changed.

Step 1: Create a Custom API Record:

1. Open the solution, click New > More > Other > Custom API from the drop-down.
2. 
Edit the fields to set the properties of your Custom API. We cannot set values for Plug-in Type unless you have already created the plug-in. You can change this later.

3. Click Save. See the below screen for reference 


Step 2: Create Request Parameter Record
  1. In the solution, click New > More > Other > Custom API Request Parameter from the drop-down.

  2. Edit the fields to set the properties of your Custom API Request Parameter. 

  3. Click Save. The form should look something like this:


Step 3: Create a Response parameter record:
  1. In the solution, click New > More > Other > Custom API Response Property from the drop-down.

  2. Edit the fields to set the properties of the Custom API Response Property.

  3. Click Save. The form should look something like this:


Step 4: Update the Custom API Plugin Type
2. Once assembly is registered, We need to set the Plugin Type value for the Custom API which we created. This is a lookup property, so we just need to find the Plug-in Type that represents the type created when we registered the assembly.


Once we have set the Plugin Type  the Custom API looks something similar to this:

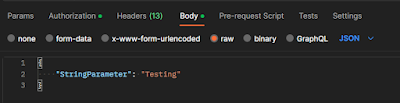
Step 5: Test the Custom API using Postman Tool
   To verify whether the correct results are returned.
Happy Learning...!!!


Write a Plug-in for the Custom API

Writing a plug-in to implement the main operation for the Custom API isn't different from writing any other kind of plug-in, except that we do not use the Plug-in Registration tool to set a specific step.

We need to know the following information follow the links below:

  • The name of the message
  • The names and types of the request parameters and response properties.

The Request Parameter values will be included in the InputParameters.

We need to set the values for the Response Properties in the OutputParameters.

The following is a simple plug-in that reverses the characters  StringParameter and returns the result as the StringProperty.

Open the Plugin Solution and add the required references and class as shown.


//Inside the class add the below code -> Save -> Build the solution:

using System;
using System.Linq;
using System.ServiceModel;
using Microsoft.Xrm.Sdk;
 
namespace MyPluginSolution
{
    public class tcc_CustomAPIExample : IPlugin
    {
        public void Execute(IServiceProvider serviceProvider)
        {
            // Obtain the tracing service
            ITracingService tracingService =
            (ITracingService)serviceProvider.GetService(typeof(ITracingService));
 
            // Obtain the execution context from the service provider. 
            IPluginExecutionContext context = (IPluginExecutionContext)
                serviceProvider.GetService(typeof(IPluginExecutionContext));
 
            if (context.MessageName.Equals("tcc_CustomAPIExample") && context.Stage.Equals(30))
            {
 
                try
                {
                    string input = (string)context.InputParameters["StringParameter"];
 
                    if (!string.IsNullOrEmpty(input))
                    {
                        //Simply reversing the characters of the string
                        context.OutputParameters["StringProperty"] = new string(input.Reverse().ToArray());
                    }
                }
                catch (Exception ex)
                {
                    tracingService.Trace("tcc_CustomAPIExample: {0}", ex.ToString());
                    throw new InvalidPluginExecutionException("An error occurred in tcc_CustomAPIExample.", ex);
                }
            }
            else
            {
                tracingService.Trace("tcc_CustomAPIExample plug-in is not associated with the expected message or is not registered for the main operation.");
            }
        }
    }

}


Register the Plugin, No need to register steps for this plugin:

- Open the Plugin Registration Tool (PRT) -> Login -> select the Dynamics 365 instance.


- Click Register -> Register new Assembly


- Select the dll file and click on Register selected plugins button


- It will look like below:


Navigate back to Custom API Creation Page to Update the Custom API and Update the Plugin Type attribute 


Thank you !!!
Happy Learning...!!!!

Thursday, December 29, 2022

How to use postman for an API request to CRM


How to use postman for an API request to CRM 

In this blog, I have shared a basic idea of how to make a request using the Postman tool.

Before getting into it will share a brief overview of Postman:

If you do not have used it already, download the app to quickly get started using the Postman API Platform. Or, if you prefer a browser experience, you can try the new web version of Postman. Click on the link to Download Postman.

Postman is an interactive and automatic tool for verifying the APIs of your project. It's a free app that can be used for making API calls. You can either directly use it without signing in by clicking on the skip option or you can signup with your personal/official account and use it. save the credentials to use them in the future.

Click on the official Postman site to learn more about the Postman tool.

Follow the step-by-step procedure to post postman requests.
1. Once successfully installed -> Click on the desktop icon to open the Postman.
2. You can skip signing in or Click on signup and create a Postman account like you do for creating a Gmail account. Once you successfully logged in, the below screen will appear.


3. Click on the Workspace -> New Workspace 


4. Create New Workspace -> Add name -> Click workspace and team 


5. Once created open the workspace which you created -> Click on the + button to add a new collection, Rename it to the proper name (Development_API) -> Click new to create a request (Get, POST, etc.) 


Now once all above is done, here is the main task you wanted was to create a request using postman. 

-> Before any request, you must get the Access Token else you will receive unauthorized error 401.

1. To avoid 401 error follow the below process to get access the token -> to copy the access token and use it:

URL

https://login.microsoftonline.com/<<tenant-id>>/oauth2/token

Method

POST

Request Header

Content-Type: “application/x-www-form-urlencoded”


Request Body

grant_type: "client_credentials"
client_id: "<<client-id>>"
client_secret: "<<client-secret>>" 
resource: "<<resource-URL>>"

Response

{
    "token_type""Bearer",
    "expires_in""6799",
    "ext_expires_in""3567",
    "expires_on""1619762946",
    "not_before""1619179782",
    "resource""https://<<organization URL>>",
    "access_token": " eyJ0eXAiOiJKV1QiLCZCI6Im5PbzNaRHJPRFhFSzFqS1doWHNsSFJfS
1hFZyJ9.eyJhdWQiOiJodHRwczovL2V5Y2FzZW1nbXRkZXYuY3JtNC5keW5hbWljcy5jb20vIiwia
XNzIjoiaHR0cHM6Ly9zdHMud2luZG93cy5uZXQvZWJiOGI4MmUtZmUwOS00Yj
dlLWE2YzctZmQzNWY0NDZiZjk2LyIsImlhdCI6MTYxOTE4MjEzMiwibmJmIjoxNj
E5MTgyMTMyLCJleHAiOjE2MTkxODYwMzIsImFpbyI6IkUyWmdZRERid1hWanp
3WkRreDNuW"
}


Note: Access token expires in 30mins so keep generating new access token and proceed

Click on send:


2. Once you get the access token you can use the same in the authorization and do your operation to Get or Post the request using API as shown in the image below:


To know more click on the references: Build Postman Requests 

Thank you!!

happy learning...

Setup Postman step by step for API Requests

 Setup Postman step-by-step for API Requests

Postman is one of the popular tools that allow us to authenticate to Microsoft Dataverse instances and compose and send Web API requests and view responses.

We can use Postman to perform ad hoc queries or to verify the behavior of operations without writing a program.

setup postman:

1. Launch and log in to Postman Desktop App or login using the browser app using your credentials
    if don't have an account create one personal account and log in. I have logged in using my Gmail account. Postman Login

2. Create a new workspace:


3. Navigate to Collections -> Create a new collection:


4. Rename the collection and -> select Add request option to create a new API request.

5. Generate a token and use it to call API requests. Navigate to the header and fill details as shown:


6. Navigate to Authorization and select type as OAuth2.0 and Add authorization data to the Request Header


7. Steps to Configure New Token:


Token Name:                      TCC Token
Grant Type:                         Client Credentials
Access Token URL:            https://login.microsoftonline.com/dec27b8f-0c94-4d69-be56-a70a818d9b55/oauth2/token?
                                            Get the access token from Azure Portal -> App registration-> Enpoints:


Client ID:                        276d50f7-cd3c-400b-bd80-0beff8b4690d

                                        Get Client ID from Azure Portal -> App Registrations -> Select and Open the app user (Query Audit Logs) My App user name


Client Secret:                        JMJ7Q~xrUEhpTLhLy_fWm8LoEfTar_bplCEz3
                                              Get the Client Secrets from the Application user -> App Registration -> Open the Application user-> Navigate to Certificate & Secrets -> Copy the value


Client Authentication:                        Send ad Basic Auth header

8. Navigate to Advanced Option and fill in Resources -> Get New Access Token:


9. Click Proceed:


10. Click Use Token:


11. The Current Token will gets added as shown:


12. Navigate to Body -> Select row -> and pass JSON value as shown:


13. Navigate to the Header URL and add a Post Request as shown -> Click on Send button:


14. The Response can be seen as shown below:


Reference: Setup Postman


Friday, November 11, 2022

Hide/Show OOB Activate and Deactivate Ribbon Button Based on Security Role D365

 Step By Step Process to hide/show Ribbon button based on security role using javascript

Hide the OOB Activate and Deactivate ribbon buttons on the D365 Form/Views based on the user security role in Dynamics 365.
On the form Activate/Deactivate Ribbon Button:


  • Create a JavaScript function that returns true or false based on whether the user has the Salesperson security role. You will see the JavaScript below:
    • False will hide the buttons
    • True will show the buttons
  • Put this function in the Contact JavaScript Library web resources. This makes it available in the ribbon and determines if the buttons should be visible.
  • Edit the buttons in the Ribbon Workbench to use the new function.

Now, let's take a look at the steps to make this happen.

1. Create JavaScript

A - Open or create a web resource to hold the JavaScript function.
B - For our purposes, the web resource is stn_ContactJavaScriptLibrary
C - Paste the following JavaScript into the web resource: 

hideActivateAndDeactivateRibbonButtons: function () {
            var value = true;
            var constSalesPersonGuid = "74E3A3A3-E6F3-4B97-A045-A557B1660293";
            var userRoles = Xrm.Utility.getGlobalContext().userSettings.securityRoles;
            for (var i = 0; i < userRoles.length; i++) {
                if (userRoles[i].toUpperCase() == constSalesPersonGuid .toUpperCase()) {
                    value = false;
                    break;
                }
            }
            return value;

        },

2 - Create Enable Rule in Ribbon Workbench

A -  Create a solution with the Contact table
B - Open solution with Ribbon Workbench
C - Right-click on Activate button

C1 - Select Customize Command


C2 - Click + next to Enable Rules


C3 - Click Add Step


C4 - Click CustomRule

C5 - Enter the function name from the Contact JavaScript Library
In this case, it is: hideActivateAndDeactivateRibbonButtons
C6 - Click the magnifying glass and select the Contact JavaScript Library

C7 - It should look like this when you are done with this step:


D - Click on the Command and then click Add Enable Rule

E - Click on the Enable Rule you created previously 


3 - For the Deactivate Button

A - Right-click on the Deactivate Button and Select Customize Command
B - Since the enable Rule already exists, we don't need to perform that step

C - Click on Command, and then click Add Enable Rule


D - Click on the Enable Rule you previously created

4 - Click Publish in the Ribbon Workbench


5 - Test it out!

You are now ready to give this solution a test before going live. Just follow these steps:

A - Look at the Contact Ribbon for a user who does not have the Salesperson security role. You will notice the Deactivate button. 


B - Add the Salesperson security role to your user

C - Go back to the Contact and do a hard refresh of the browsers tab and there should be no Deactivate button. 


D - Test the activate button by: 
D1 - Removing the Salesperson role from the user
D2 - Doing a hard Refresh of the Contact tab
D3 - Check to see if the Deactivate button is visible on the Contact
D4 - Click the Deactivate button
D5 - Now you should see the Activate button
D6 - Add the Salesperson role to the user
D7 - Do another hard refresh of the Contact tab

D8 - And now the Activate button is no longer visible.
Note: To hide Activate/Deactivate button on View - Add the same enable rule as how it's done for form.