📝Writing, registering, and debugging a plug-in in Dynamics 365
Below are the topics which are covered as part of Dynamics 365 Plugin C# Code.
- How to Write a Basic Plugin?
- How to Register a Plugin?
- How to Debug a Plug-in?
Follow the complete step-by-step process written below:
Before Moving ahead a Short Overview:
- Create a .NET Framework Class library project in Visual Studio
- Add the
Microsoft.CrmSdk.CoreAssemblies NuGet package to the project - Implement the IPlugin interface on classes that will be registered as steps.
- Add your code to the Execute method required by the interface
- Get references for services you need
- Add your business logic
- Sign & build the assembly
- Test the assembly
- Register the assembly in a test environment
- Add your registered assembly and steps to an unmanaged solution
- Test the behavior of the assembly
- Verify that expected trace logs are written
- Debug the assembly as needed
Note: If you want to learn more on plugin development click here.
Lets Begin:
Follow the below steps to write a sample plug-in:
Step 1: Open Visual Studio > Click on File > New Project: As shown below
1. Select Visual C#
2. Class Library (.Net Framework)
3. Give Name to Your Plugin (MyPlugin) or (Followup)
4. Path (Location where you want to save your Plugin project)
5. Solution Name (MyCRM) or (Basic Plugin)
6. Select Framework (choose the latest framework)
7. Click Ok
*Note: Screenshot names might differ, just giving an example which can help you to easily refer, you can give any meaningful name as per your project work requirement.
Step 2:
- In Solution Explorer, right-click the project and select Manage NuGet Packages… from the context menu.
- Select Browse and search for Microsoft.CrmSdk.CoreAssemblies and install the latest version.
- You must select I Accept in the License Acceptance dialog.
- In Solution Explorer, right-click the Class1.cs file and choose Rename in the context menu.
- Rename the Class1.cs file to HelloWorld.cs- When prompted, allow Visual Studio to re-name the class to match the file name.
//*You can use the below Sample code:
using
System.Collections.Generic;
using
System.Linq;
using
System.Text;
using
System.Threading.Tasks;
using
Microsoft.Xrm.Sdk;
using
System.ServiceModel;
namespace BasicPlugins
{
public class FollowUp: IPlugin
{
public void
Execute(IServiceProvider serviceProvider)
{
// Extract the
tracing service for use in debugging sandboxed plug-ins.
// If you are
not registering the plug-in in the sandbox, then you do
// not have to
add any tracing service-related code.
ITracingService tracingService =
(ITracingService)serviceProvider.GetService(typeof(ITracingService));
// Obtain the
execution context from the service provider.
IPluginExecutionContext context =
(IPluginExecutionContext)
serviceProvider.GetService(typeof(IPluginExecutionContext));
// Obtain the
organization service reference which you will need for
// web service
calls.
IOrganizationServiceFactory
serviceFactory =
(IOrganizationServiceFactory)serviceProvider.GetService(typeof(IOrganizationServiceFactory));
IOrganizationService service =
serviceFactory.CreateOrganizationService(context.UserId);
// The
InputParameters collection contains all the data passed in the message
request.
if (context.InputParameters.Contains("Target") &&
context.InputParameters["Target"] is Entity)
{
// Obtain
the target entity from the input parameters.
Entity entity =
(Entity)context.InputParameters["Target"];
try
{
// Plug-in business logic goes here.
}
catch (FaultException<OrganizationServiceFault> ex)
{
throw new InvalidPluginExecutionException("An
error occurred in MyPlug-in.", ex);
}
catch (Exception ex)
{
tracingService.Trace("MyPlugin: {0}",
ex.ToString());
throw;
}
}
}
}
Step 3: Build Plug-in, In Visual Studio, press F6 to build the assembly. Verify that it compiles without error.
Step 4:
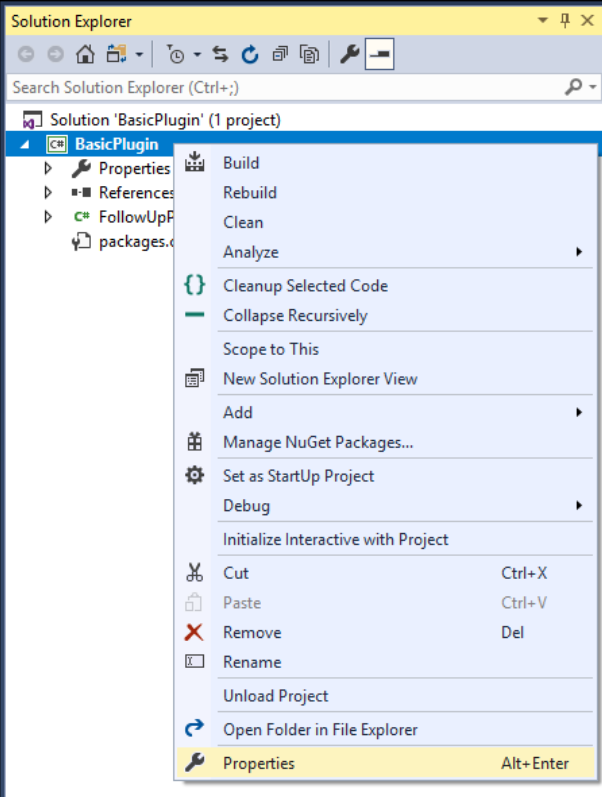
1. Sign Plugin, In Solution Explorer, right-click the BasicPlugin project and in the context menu select Properties.
2. In the project properties, select the Signing tab and select the Sign the assembly checkbox.
3. In the Choose a strong name key file: dropdown, select <New…>.
4. In the Create Strong Name Key dialog, enter a key file name and deselect the Protect my key file with a password checkbox.
5. Click OK to close the Create Strong Name Key dialog.
6. In the project properties Build tab, verify that the configuration is set to Debug.
7. Press F6 to build the plug-in again.
8. Using windows explorer, find the built plug-in at: \bin\Debug\BasicPlugin.dll.
Step 5:
👉Registering a plug-in
To register a plug-in, you will need the plug-in registration tool > Download and extract Dynamics 365 SDK in any folder > Now navigate to SDK\Tools\PluginRegistration
Here you will see the pluginRegistration.exe file.
Connect using the Plug-in Registration tool
After you have downloaded the Plug-in registration tool, click the PluginRegistration.exe to open it.
Click Create a new Connection to connect to your instance.
Make sure Office 365 is selected. If you are connecting using a Microsoft account other than the one you are currently using, click Show Advanced.
4. Enter your credentials and click Login.
5. If your Microsoft Account provides access to multiple environments, you will need to choose an environment.
6. After you are connected, you will see any existing registered plug-ins & custom workflow activities
Register your assembly
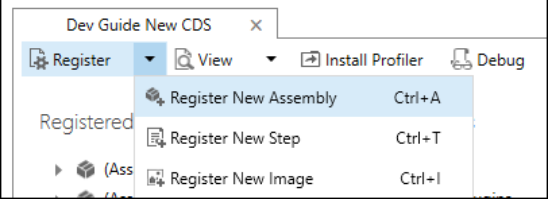
1. In the Register drop-down, select New Assembly.
2. In the Register New Assembly dialog, select the ellipses (…) button and browse to the assembly you built in the previous step.
3. For Microsoft 365 users, verify that the isolation mode is a sandbox and the location to store the assembly is Database.
4. Click Register Selected Plug-ins.
5. You will see a Registered Plug-ins confirmation dialog.
6. Click OK to close the dialog and close the Register New Assembly dialog.
7. You should now see the (Assembly) BasicPlugin assembly which you can expand to view the (Plugin) BasicPlugin.FollowUpPlugin plugin.
Register a new step
1. Right-click the (Plugin) BasicPlugin.FollowUpPlugin and select Register New Step.
2. In the Register New Step dialog set the following fields:
👉Debugging a Plug-in
2. Install plug-in profiler > In the Plugin Registration tool, click Install Profiler.
3. This will install a new managed solution named Plug-in Profiler in your Microsoft Dataverse environment. This will take a minute or two to complete.
4. Start profiling > In the Plugin Registration tool, select the (Step) BasicPlugin.FollowupPlugin: Create of account step you registered earlier, and click Start Profiling.
5. In the Profiler Settings dialog accept the default settings and click OK to close the dialog.
6. Capture a profile > In your model-driven app, create a new account to trigger the plug-in. This will capture an instance of the plug-in executing and persist it as a profile record in the system.
7. In the Plug-in Registration tool, click Debug.
8. In the Replay Plug-in Execution dialog, on the Setup tab, click the  icon to open the Select Profile from CRM dialog.
 9. In the Select Profile from CRM dialog, select the profile where Type Name equals BasicPlugin.FollowupPlugin and represents the profile captured when you last triggered the plug-in.
10. Debug your plug-in > In the Replay Plug-in Execution dialog, on the Setup tab, in the Specify Assembly section, click the ellipses (…) button and choose the location of your BasicPlugin.dll.
11. In your Visual Studio project, set a breakpoint in your plug-in class.
12. In your Visual Studio project, select Debug > Attach to Process….
13. Select the PluginRegistration.exe process and click Attach.
Note: See Plug-in Registration tool is now running in debug mode.
14. In the Replay Plug-in Execution dialog, click Start Execution.
15. In your Visual Studio project, you should see that the code is paused at the breakpoint you set earlier.
16. You can now step through your code to debug.
17. Repeat > To repeat, in your Visual Studio project select Debug > Reattach to process, and in the Replay Plug-in Execution dialog click Start Execution again.
18. Stop profiling > Close the Replay Plug-in Execution dialog
19. In the Plug-in Registration tool, click Stop Profiling.
You can refer to the MS link for more details:
https://docs.microsoft.com/en-us/powerapps/developer/data-platform/tutorial-debug-plug-in
That's all!
Thank you!
Happy Learning... Keep CRMing..!


No comments:
Post a Comment