Hide/Show Out of the box Ribbon button based on security role
Recently, we received a request from a customer who wanted to hide the Activate and Deactivate buttons on the Contact ribbon based on the user security role in Dynamics 365 Sales.
In this case, they wanted to hide them for users with the Salesperson security role.

There is a solution for this, and in this blog post, we will detail how you can take advantage of Ribbon Workbench and JavaScript to achieve it. The solution works for On-Prem (v8) and Online Dynamics 365 (v9.) The solution for both is very similar, with the only difference being one line of JavaScript, which we will highlight below.
To begin, we will do the following:
- Create a JavaScript function that returns true or false based on whether the user has the Salesperson security role. You will see the JavaScript below:
- False will hide the buttons
- True will show the buttons
- Put this function in the Contact JavaScript Library web resources. This makes it available in the ribbon and determines if the buttons should be visible.
- Edit the buttons in the Ribbon Workbench to use the new function.
Now, let's take a look at the steps to make this happen.

1 - Find Salesperson security role Guid - Open Security Role and copy the Guid shown below
- Do not include the prefix, '%7b' or the end, '%7d'
2 - Create JavaScript
A - Open or create a web resource to hold the JavaScript function.
B - For our purposes, the web resource is stn_ContactJavaScriptLibrary
C - Paste the following JavaScript into the web resource:
- //
// Hide the Activate button and the Deactivate button when user has Salesperson security role
//
function hideActivateAndDeactivateRibbonButtons() {
//
// default return value to true. Show buttons
//
var value = true;
//
// Set variable with SalesPerson security role GUID
//
var constSalesPersonGuid = "74E3A3A3-E6F3-4B97-A045-A557B1660293";
//
// Get the Current User's Security Roles
//
// D365 v8
// var userRoles = Xrm.Page.context.getUserRoles();
//
// D365 v9
var userRoles = Xrm.Utility.getGlobalContext().userSettings.securityRoles;
//
// loop through roles and look for SalesPerson guid
//
for (var i = 0; i < userRoles.length; i++) {
if (userRoles.toUpperCase() == constSalesPersonGuid.toUpperCase()) {
//
// Hide Activate button and the Deactivate button
//
value = false;
break;
}
}
return value;
}
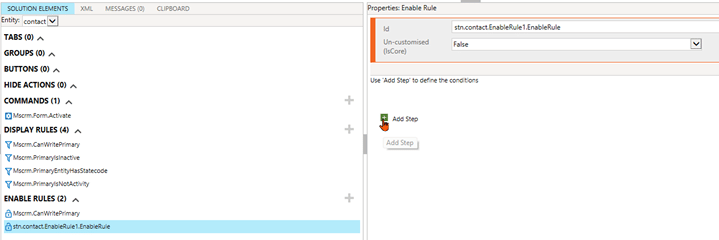
3 - Create Enable Rule in Ribbon Workbench
A - Create a solution with the Contact table
B - Open solution with Ribbon Workbench
C - Right-click on Activate button
C1 - Select Customize Command

C2 - Click + next to Enable Rules

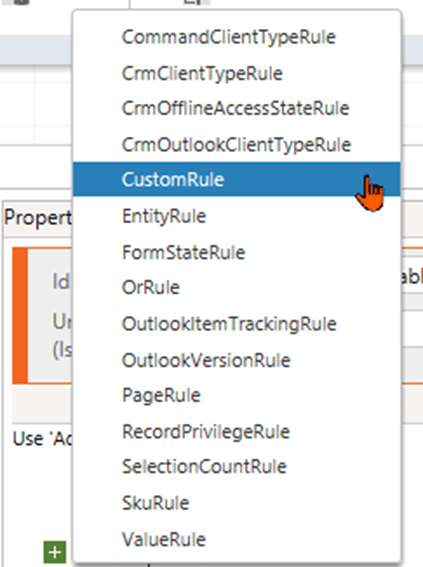
C3 - Click Add Step
C4 - Click CustomRule
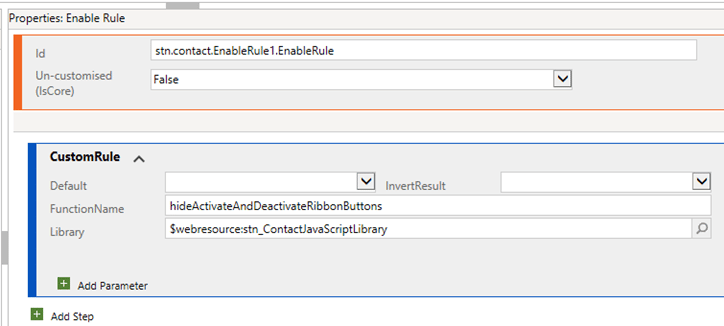
C5 - Enter the function name from the Contact JavaScript Library
- In this case, it is: hideActivateAndDeactivateRibbonButtons
C6 - Click the magnifying glass and select the Contact JavaScript Library
C7 - It should look like this when you are done with this step:
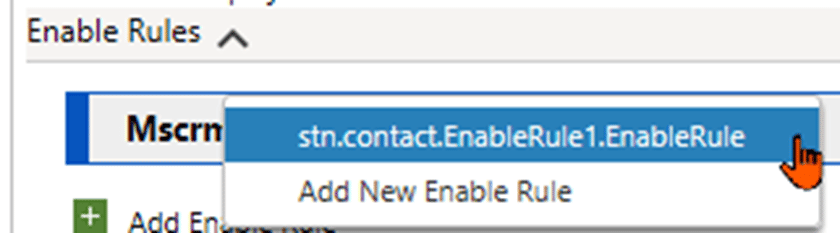
D - Click on the Command and then click Add Enable Rule

E - Click on the Enable Rule you created previously

4 - For the Deactivate Button
A - Right-click on the Deactivate Button and Select Customize Command
B - Since the enable Rule already exists, we don't need to perform that step
C - Click on Command, and then click Add Enable Rule
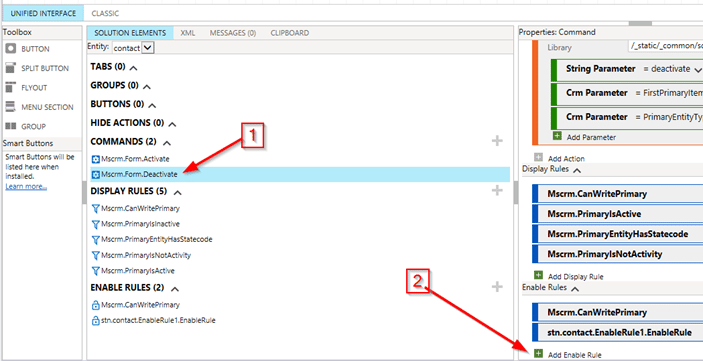
D - Click on the Enable Rule you previously created
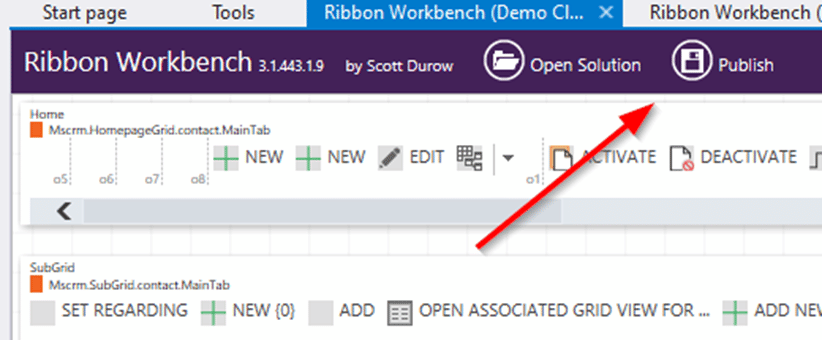
5 - Click Publish in the Ribbon Workbench
6 - Test it out!
You are now ready to give this solution a test before going live. Just follow these steps:
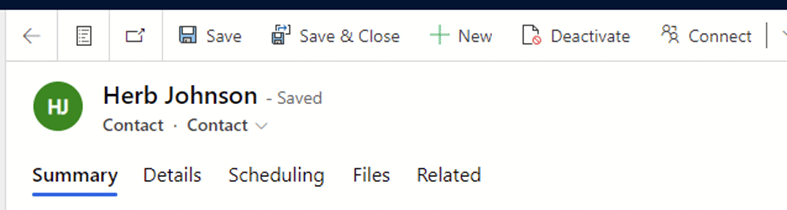
A - Look at the Contact Ribbon for a user who does not have the Salesperson security role. You will notice the Deactivate button.
B - Add the Salesperson security role to your user

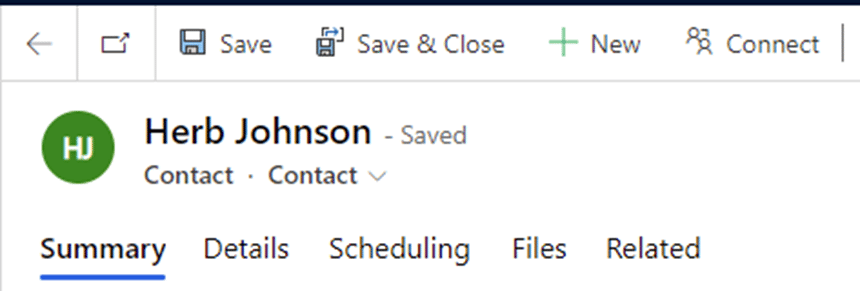
C - Go back to the Contact and do a hard refresh of the browsers tab and there should be no Deactivate button.
D - Test the activate button by:
D1 - Removing the Salesperson role from the user
Refer the link below:
Click Here to Navigate to original post

No comments:
Post a Comment