Friday, July 8, 2022

Dynamics 365 Omnichannel for Customer Service WhatsApp channel integration through Twilio service provider

Configure a WhatsApp channel through Twilio:

Omnichannel for Customer Service offers a suite of capabilities that extend the power of Dynamics 365 Customer Service Enterprise to enable organizations to instantly connect and engage with their customers across digital messaging channels. An additional license is required to access Omnichannel for Customer Service.


In this blog, we will focus on how to integrate the WhatsApp channel through Twilio providers and have conversations with users directly through WhatsApp messaging.

Let's begin step by step:

1. log in to Dynamics 365 Instance 
2. Click and open Customer Service admin center App 


3. First Create a WhatsApp Queue -> Navigate to Customer Support Area and Click on Queues -> Create a queue by clicking on (+ New Queue) button -> fill the details -> click Create 

4. Once created -> Add users to the queue
5. Navigate back to 
Customer Support Area click on Channels and Add Account  by clicking (+ New Account) button -> select channel as WhatsApp -> fill details -> Click Next
6. Keep this browser open -> now Open another browser or another tab and open the Twilio website (
Twilio)
Once its opened login to it, from here we will need Account SID and Authentication Token.
once we got these details we need to navigate back to Dynamics CRM browser where account creation is in progress. Put these two details.

Note: If you have already created an account on Twilio you can directly log in else create an account and then sign in.

Login -> Twilio

Once logeed in successfully -> Navigate to Twilio Console as you can see in the below screen.

-> Copy
Account SID and Auth Token from here and keep it.


7. Once copied -> Navigate back to the previous Dynamics CRM browser where you are creating your Account.

-> fill in Account Details, Account SID and Authentication Token as shown below -> Click Next  -> Add WhatsApp number 


8. Keep Add WhatsApp window opened  -> Navigate back to Twilio website and Copy the WhatsApp number.


9. Navigate back to the Dynamics CRM browser where the account is being created -> fill WhatsApp number and name -> Click Add and Then Click Next


10. Copy the Twilio inbound URL and keep it. We need this into the Twilio account (Inbound URL has to be added in Twilio)-> Click Done 


The account is added to the list


11. Navigate back to the Twilio website -> Navigate to WhatsApp Sandbox settings -> Paste the copied Inbound URL (Which you copied from Dynamics CRM) in the box (When a Message Comes in) -> Click on Save


12. Navigate back to Dynamics CRM -> Click on Workstreams -> click on 
Create a (+ new Workstream) button -> Fill in all the details -> Select Type as Messaging, Channel as WhatsApp -> Queue -> WhatsApp queue(which you created in the begining) -> others just keep it default -> click Create (as shown below)


13. Once created -> click on Setup WhatsApp -> Fill Details -> click Next
14.  Select the WhatsApp Number which you configured in the previous step -> Click Next

15. Keep Language English -> Next, Keep Behaviour default as is -> Next, Keep User Features Default -> Next -> Review and Finish -> Click on Create Channel -> click on Done


It got added to the list.

 16. Routing rule + Work distribution these items you can configure based upon your business requirement. I am keeping as-is for this demo.

17 Now the final step is to do the Testing: 
-> Open Your Mobile Whatsapp application -> Add your Twilio WhatsApp support number which you have configured above. 

Now Login Dynamics CRM with Customer Representative Role so that when a chat request is sent through whatsApp  WhatsApp requests can be accepted and conversation can begin.

See in the below screen a Customer Representative Agent is loged in.


Now send a chat message from your WhatsApp number.


The customer Representative Agnet receives the incoming conversation request -> Click on Accept 


Once accepts the below screen pops up ->


Start your conversation.


Yay! we did it... 

That's all...
Happy Learning...

Thank you...

Dynamics 365 Omnichannel for Customer Service Microsoft Teams Channel Integration

Dynamics 365 Omnichannel for Customer Service:

Omnichannel for Customer Service offers a suite of capabilities that extend the power of Dynamics 365 Customer Service Enterprise to enable organizations to instantly connect and engage with their customers across digital messaging channels. An additional license is required to access Omnichannel for Customer Service. 

In this blog, We will focus on Microsoft Teams Channel Integration

With help of Microsoft Teams Channel Integration, users will be able to send a chat request using Microsoft teams Apps. This integration is beneficial for Internal employees, they can open an MS Teams chat App and directly have a conversation with the support team and can resolve their queries or issue instantly.

Follow the below step-by-step process to configure Microsoft Teams Channel for Omnichannel:

1. log in to Dynamics 365 Instance where Omnichannel Setup is done.

2. Navigate and open the Customer service admin center app


3.  Navigate to Queue -> Click on Advanced Queues -> Manage Queue


4.  Click on the +New Queue button and Fill it below details to create a new queue for MS teams as shown to keep all the MS teams-related chat in this queue -> Click Create


5.  Once created -> click on Add Users 


6.  Select user from the list -> this user will be part of this queue and whenever a new chat request is initiated it will directly point to a member of this queue.

Now click Add 


7. Once the queue is created -> Navigate back to Channels -> Accounts -> click on Manage


Click on the + New Account button

Add Account -> Fill Channel Details  -> Next


Keep Account Details As is -> Click Next
Copy Bot ID and keep it for future use, then click on Done


8. Navigate to Workstreams -> +New Workstream -> Create a workstream -> Fill Details (Type: Messaging, Channel: Microsot Teams) -> Select Queue which is created in previous step -> Click on Create


Once Created -> Click on Setup Microsoft Teams


A window pops up do Microsoft Teams Setup -> Fill Channel Details -> Click Next


Select Channel which you have created in the previous step -> Click Next


Keep Language as English -> Next -> Keep Behaviour as is -> Click Next -> User Feature keep as is -> Click Next -> Review and Finish -> Click Create Channel


Click on Done

9. Routing Rule + Work Distribution keep all default. You can make changes based on your business requirements. I'm keeping it as default for this demo.

10. Now next step is to set up Microsoft Teams App -> The Bot ID which we have copied from the previous step we will use it here while setting MS Teams App.

Refer Link below: 
Click on the URL How to Create a Microsoft Teams App step by step?

11. Once you have created a Microsoft Teams App by following referred URL in Step 10, The final step is to do the testing and verify if it works perfectly.

For Testing, log in with Role as Customer Representative -> You will be redirected to  Omnichannel for Customer Service App If not Open it by selecting from the apps as shown:

Let it load 100% -> on the right-hand side top corner check the customer representative status is green -> If Yes you are good to go...

Now navigate to another browser window where the MS teams site is opened -> open Microsoft Teams App which you have created based on the previous step (Link URL) -> This is the app which I have created for this demo purpose 

Open the MS Teams site and open the App -> and Send a Chat Request 


Navigate to another browser where the Customer Representative is online and accept the chat request


Once accepted It pops up Customer Representative Chat window as shown


Navigate back and check if the User received the chat or not


Conversation windows:

Customer Representative Window: 


MS Teams Site – App User (Internal Employee)


Yay!! It's working... MS Teams Channel integration is done successfully.


That's All...
Happy Learning...

Thank you!!!

Tuesday, July 5, 2022

Create a customer support app in Microsoft Teams and integrate it with D365 Omnichannel MS Teams Channel

How to Create an App in Microsoft Teams?

We are going to create an App in Microsoft Teams and will use Bot ID from the D365 Omnichannel Application. The same app we will use for chat.

Follow the step-by-step process:

1. log in to: https://teams.microsoft.com/

2. Click on 3 dots (...) and open Developer Portal


3. Click on Add

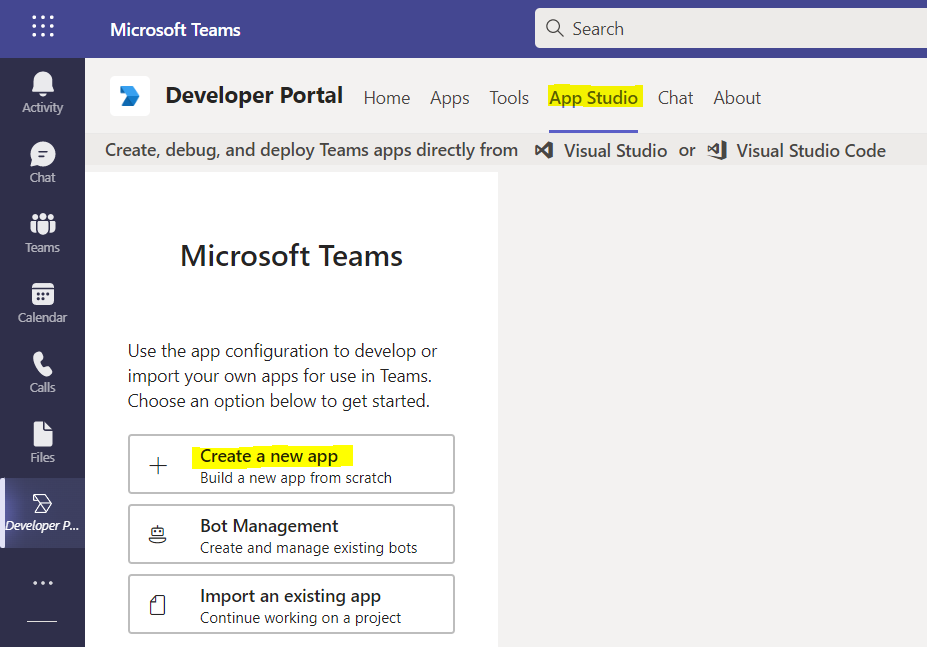
4. Once Added -> Navigate to App Studio -> and Click on Create a new app


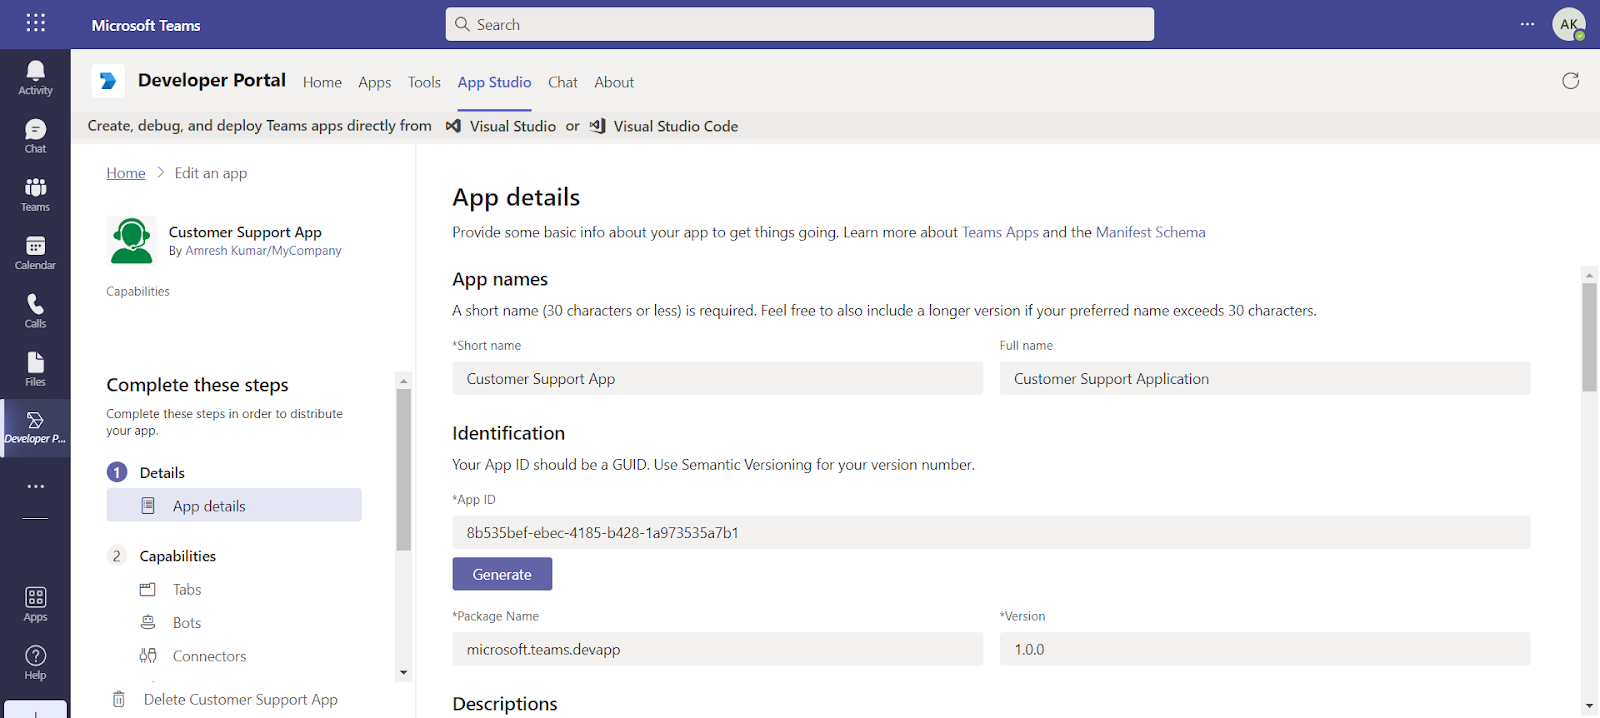
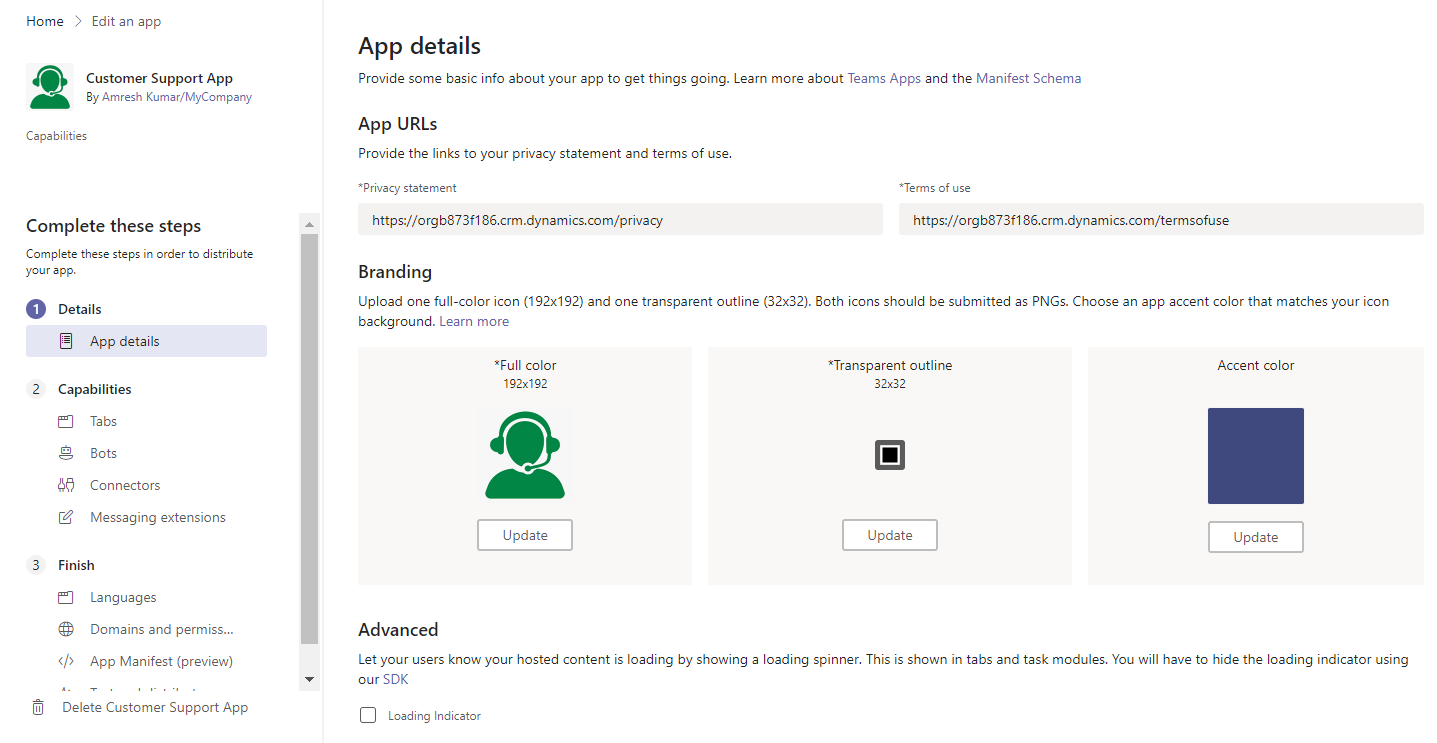
5. Fill in all the details as shown:

a) App Details: Click on Generate and Generate AppID


b) Navigate to Capabilities and Click on Bot -> SetUp Bots -> and then Click on Save

Navigate to D365 Instance where you are setting up the MS Teams Channel -> Copy Bot ID


Navigate back to MS teams -> Paste it as shown below:


c) Navigate to Finish and Click on Test and distribute 


Click on Publish:


Click on Submit:

Click on View Status:


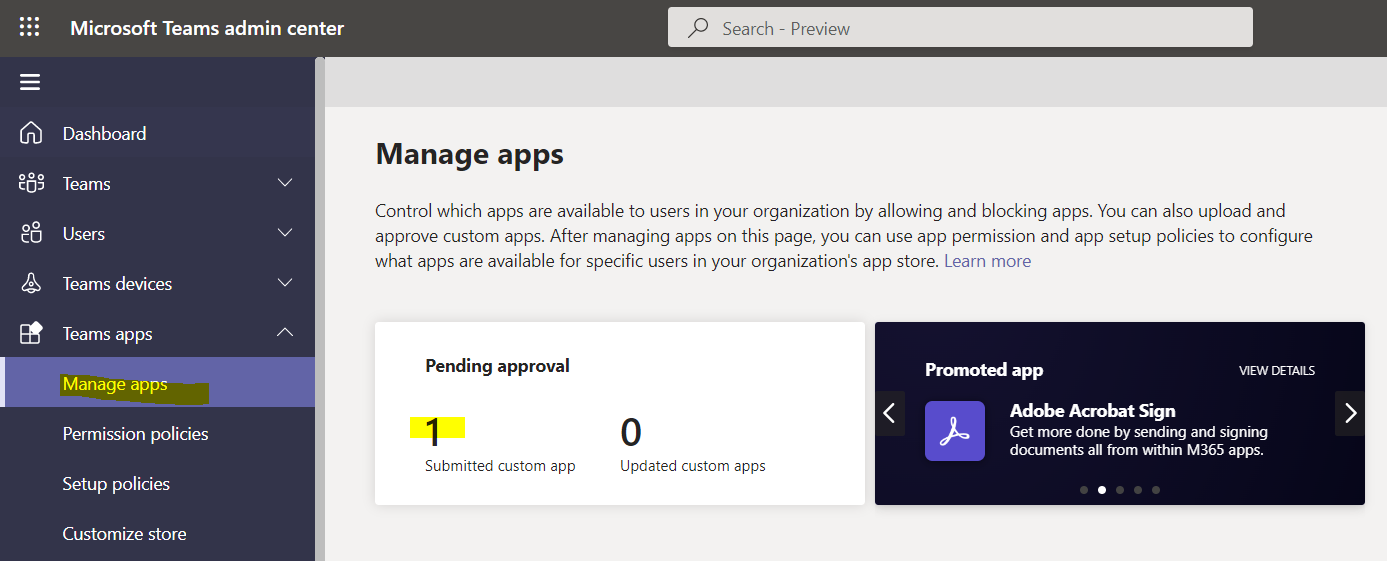
6. Open Microsoft Teams admin portal to approve the App which you have submitted for approval:


Navigate to Teams apps -> Click on Manage apps 


Search App name as shown -> Select and click on Allow button:


Open it and click on publish button:


7. Once published -> navigate back to the Microsoft Team site -> Click on view status 


8. Refresh the Microsoft Teams Site -> Our App is ready. Now it can be used for Chat. 


Open it and click on Add it and use it for a chat:


Refer to my other blogs for Integrating with Different channels in D365 Omnichannel.

That's it...

Thank you ...
Happy Learning...