Wednesday, June 29, 2022

ADDING THE APPLICATION USER TO DYNAMICS 365

 Follow the below step-by-step process to Add Application User to Dynamics 365

Step 1:

Open the Power Platform Admin Centerhttps://admin.powerplatform.microsoft.com/ as a System Administrator, and select your Dynamics 365 Environment, then select Settings.


Step 2:
Click New app user from the list of Application users.


Step 3: From the Create a new app user screen, click Add an app and select the App you created earlier.

Step 4:

Select the Business unit to add the app user to.

Select the Security roles to assign to the user once created. For example, System Administrator & Customizer.


Step 5: Click Create, and you’ll see the user has been added to your environment. You’ll also notice the App ID is the same Application (client) ID copied in while creating in Azure (Copied).


Step 6:

You should now have the Client ID copied from Azure, and the Client Secret copied from Azure. Combine these with your Environment URL, and you’ll have everything you need to grant your application access to your Dynamics 365 environment.


Refer: Create an Application user in Azure for Dynamics 365

Thank you ...
Happy CRMing...
More Power...

Create an Application user in Azure for Dynamics 365

How to Set up an Application User in Azure and Use it in Dynamics 365?

Before we proceed to create an Application User, First let us understand why we require an Application User.

An application user is a user within Dynamics 365 that is tied to an Azure Active Directory Application and performs tasks in Dynamics 365 on behalf of that application.

  • Application users are used for server-to-server (S2S) authentication to securely communicate with Dynamics 365 with custom applications and services. 
  • It is in conjunction with Azure Active Directory (Azure AD) that will establish S2S authentication.
  • These users do not consume any service licenses.
  • It is created with a non-interactive user account, however, it is not counted towards the 5 non-interactive user accounts limit.
  • Application users cannot use out-of-the-box (OOB) security roles; a custom role must be made for them.
  • Application users do not authenticate with a username and password, they authenticate with a “Client Id” and “Client Secret”.

The purpose of the application users?

  • The application user is a built-in user account that is used to perform integration and system back-end service to support a particular feature.
  • Since these are built-in user accounts, they can't be updated. The security role that is assigned to these accounts cannot be updated either. This is to prevent any service outages.
  • These users do not consume any service licenses.
Let's begin ...


2. Open Azure Active Directory


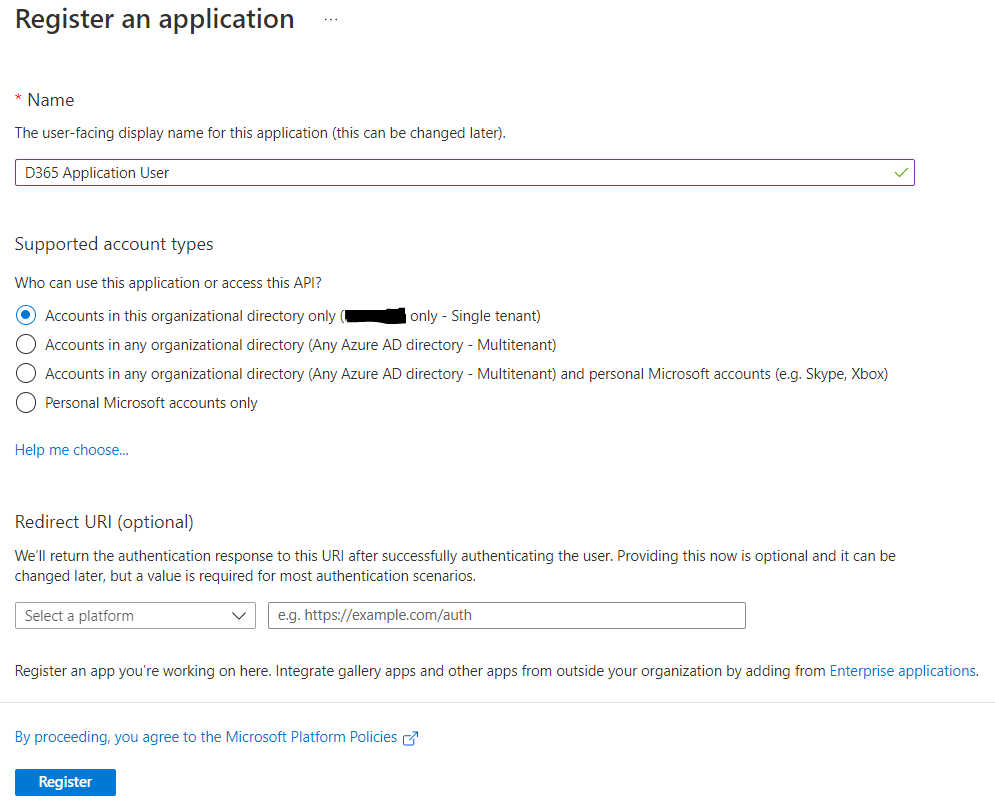
3. Open App Registration -> Click on New Registration


4. Set the Name - this will become the name of the user in Dynamics 365.

Leave the Supported account type as Single-tenant (the default value).

Click Register


5. Notice on the left top corner 


6. Once created, copy the Application (client) ID of the new App registration. This will be used later as the Client ID.


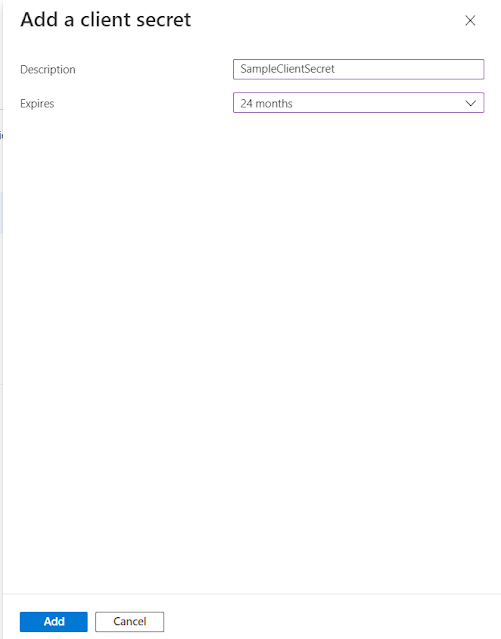
7. Navigate to Certificates & secrets and click New client Secrets, under Client secrets.


8. Enter a description of the client's secret (optional).

Select the expiry date for the client's secret. The maximum you can select is 24 months. After the expiry, a new secret will need to be generated, and any applications using the secret will need to be updated. It’s worth setting a reminder for this, to avoid any service interruptions.

Click Add


9. Once the secret is created, copy the Value. This will be used as the Client's Secret later. This is the only chance you’ll have to copy the secret, so be sure to save it somewhere safe. If you lose the value, you can always generate another later.


10. Navigate to API permissions and select Add permission.


11. From the Request API permissions screen, under Microsoft APIs, select Dynamics CRM.


12. 
Under Delegated permissions, select user_impersonation, and then click Add permissions.


13.  Added successfully


That's all ...
Thank you!!!
Happy Azuring 
Happy CRMing...


Create Azure Data Factory for Dynamics 365

What is Azure Data Factory?

  1. Azure Data Factory (ADF) is a fully managed, serverless data integration solution for ingesting, preparing and transforming all your data at scale.
  1. It enables every organization in every industry to use it for a rich variety of use cases: data Engineering, migrating their on-premises SSIS packages to Azure, operational data integration, analytics, ingesting data into data warehouses, and more. 
  1. Azure Data Factory enables organizations to ingest data from a rich variety of data sources. Whether the data source is on-premises, multi-cloud, or provided by Software-as-a-Service (SaaS) providers, Azure Data Factory connects to all of them at no additional licensing cost. 

Why Use Azure Data Factory with Dynamics 365 / Power Platform?
Azure Data Factory is ideal for situations where you need to migrate or bulk update large quantities of data
Handle Large Volumes of Data, Take Advantage of Speed and Save Time and Resources

Let's Begin...

Follow the below step-by-step process to create Azure Data Factory.

Note: Only the account which is having Azure service license assigned will be able to create it. You can create a trial and use it for 1 month.

1. Login to:  https://portal.azure.com/ with the licensed account which is having global Admin permission.

2.  Search or Look for Data Factories -> Click and open it


3.  Click on Start with an Azure free trial -> It will get open in a new window


4. Fill in all the mandatory details -> Verify your Phone Number -> Enter Address details -> Select Agreements -> Click on Next -> Verify Your Identity Verification By Card -> Finally Click on Sign Up 

Note: You can use your Credit Card for it and it will charge Rs 2 which will be automatically reverted back to the same card.


5.  Once created -> navigate to https://portal.azure.com -> and Click on Data factories (as in step 2) -> Click on Create


6.  Fill in all the below details as shown and click Next: Git Configuration

Note: If the Resource Group is not there create a new resource group by clicking on Create new link.


7. Click Configure Git Later -> Click Next: Networking


8. Keep as is and Click Next: Advanced


9.  Click Next: Tags


10. Click Next: Review + Create


11. Finally Click on Create 


12. It starts initializing + Submitting Deployment


13. Once deployment is completed click on Go to resources


14. Our Azure Data Factory Creation is Completed Now we can use it for any data operations.


That's all...
Thank you ..

Happy Azuring...

Console application to connect to Dynamics 365 On-premise using AuthType IFD

Console Application code to connect to Dynamics 365 on-premise,  follow the below step-by-step process to connect, using AuthType as IFD

1. Open Visual Studio -> File -> New -> Project -> Search & Select C# Console Application (.Net Framework) -> Click Next 


2. Give a suitable name for your project -> Click Create

3. Add all the references 
Click on Refernces -> Manage NuGet Packages -> Search for Microsoft.Xrm.Tooling.CoreAssembly  and install it


4. Add below references to your program.cs file

using Microsoft.Xrm.Sdk;
using Microsoft.Xrm.Sdk.Client;
using Microsoft.Crm.Sdk.Messages;
using System.Net;
using System.ServiceModel.Description;
using Microsoft.Xrm.Tooling.Connector;

5.  Below is the code to connect to Dynamics 365 On-Premise pass Domain, AuthType = IFD, user Name, Password, and URL

 IOrganizationService oServiceProxy;

            //Create the Dynamics 365 Connection:
            CrmServiceClient oMSCRMConn = new Microsoft.Xrm.Tooling.Connector.CrmServiceClient("Domain=<DomainName>; AuthType=IFD;Username=<User Email ID>;Password=<EnterPassword>;URL=https://<URL>.com/OrgName;");

            //Create the IOrganizationService:
            oServiceProxy = (IOrganizationService)oMSCRMConn.OrganizationWebProxyClient != null ? (IOrganizationService)oMSCRMConn.OrganizationWebProxyClient : (IOrganizationService)oMSCRMConn.OrganizationServiceProxy;
            if (oServiceProxy != null)
            {
                //Get the current user ID:
                Guid userid = ((WhoAmIResponse)oServiceProxy.Execute(new WhoAmIRequest())).UserId;

                if (userid != Guid.Empty)
                {
                    Console.WriteLine("Connection Successful!");
                }
            }
            else
            {
                Console.WriteLine("Connection failed...");
            }

6. Below is the complete code:

using System;
using System.Collections.Generic;
using System.Linq;
using System.Text;
using System.Threading.Tasks;
using Microsoft.Xrm.Sdk;

using Microsoft.Xrm.Sdk.Client;
using Microsoft.Crm.Sdk.Messages;
using System.Net;
using System.ServiceModel.Description;
using Microsoft.Xrm.Tooling.Connector;

namespace ConsoleApp1
{
    class Program
    {
        static void Main(string[] args)
        {
            IOrganizationService oServiceProxy;

            //Create the Dynamics 365 Connection:
            CrmServiceClient oMSCRMConn = new Microsoft.Xrm.Tooling.Connector.CrmServiceClient("Domain=XXXX; AuthType=IFD;Username=XXXXX;Password=XXXXX;URL=XXXXXXX;");

            //Create the IOrganizationService:
            oServiceProxy = (IOrganizationService)oMSCRMConn.OrganizationWebProxyClient != null ? (IOrganizationService)oMSCRMConn.OrganizationWebProxyClient : (IOrganizationService)oMSCRMConn.OrganizationServiceProxy;
            if (oServiceProxy != null)
            {
                //Get the current user ID:
                Guid userid = ((WhoAmIResponse)oServiceProxy.Execute(new WhoAmIRequest())).UserId;

                if (userid != Guid.Empty)
                {
                    Console.WriteLine("Connection Successful!");
                }
            }
            else
            {
                Console.WriteLine("Connection failed...");
            }

        }

    }

}

7.  This is how the code looks in the Visual Studio:


8. Test -> Build & Debug 


That's all.....

Thank you!!!
Happy CRMing...!!!